When I started 3D printing, rough surfaces were frustrating. Over time, I learned it’s often due to temperature, nozzle issues, or settings. Fixing these taught me a lot, and now I enjoy smoother prints. Let’s improve yours together!
3d printer rough surface ( short answer)
Rough surfaces on 3D prints happen due to settings, nozzle, or filament problems. Check layer height, clean the nozzle, and adjust temperatures. Small changes can fix the issue and give your 3D prints a smoother finish!
In this article we will discuss 3d printer rough surface.
What is a 3d printer rough surface?

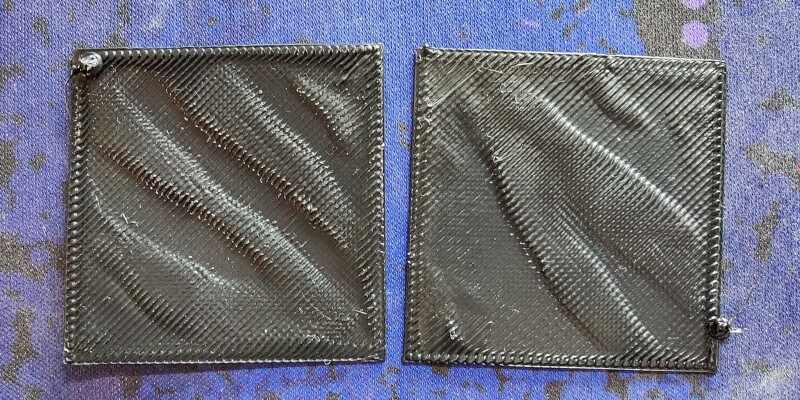
A 3D printer rough surface is when the outer part of a 3D print feels bumpy or uneven instead of smooth. This can happen because of issues like wrong printer settings, nozzle dirt, or filament problems.
For example, if the temperature is too high or low, or the layers don’t stick properly, the surface might look rough. Fixing this usually involves cleaning the nozzle, adjusting the settings, or using good-quality filament to make the print smooth and neat.
Why Do Rough Surfaces on the First Layer Matter and What Causes Them?
Rough surfaces on the first layer matter because they affect the entire 3D print’s quality and durability. The first layer serves as the foundation, and if it isn’t smooth and properly adhered, the rest of the print can have issues like warping, weak layers, or poor structural integrity. A 3D printer rough surface on the first layer can also make the object less visually appealing.
Common causes included:
- Uneven Print Bed: If the bed isn’t level, the first layer may not stick evenly.
- Wrong Nozzle Height: A nozzle that’s too close or far from the bed creates rough patches.
- Dirty or Damaged Bed: Dirt or scratches on the print bed affect the surface quality.
- Incorrect Temperature: If the bed or nozzle temperature is too high or low, it can cause roughness.
- Fast Print Speed: Printing too quickly can lead to uneven extrusion and a rough first layer.
Rough surface after first layer issue – Fix Rough Prints!

A rough surface after the first layer in 3D printing is a common problem caused by incorrect settings, uneven bed leveling, or poor filament quality. When the nozzle height is too close or far, or the print bed isn’t clean or leveled properly, it can lead to rough patches.
Fast printing speeds and incorrect temperatures can also contribute. To fix this, ensure proper bed leveling, adjust nozzle height, use good-quality filament, and clean the bed. These steps help achieve a smooth first layer and improve print quality.
How does surface roughness impact the durability of 3D printed parts?
Surface roughness affects the durability of 3D-printed parts by creating weak spots. Rough surfaces can have tiny gaps or uneven layers that make the part less strong and more likely to break under stress. Smooth surfaces allow layers to stick together better, improving the part’s strength and lifespan.
If a part needs to handle heavy loads or frequent use, reducing surface roughness is important. Fixing rough surfaces makes 3D prints more durable and reliable for everyday use.
Read Also: 3d printer bulging corners – Enhance Print Quality!
How does the Ra value affect the functionality of a 3D printed object?

The Ra value measures how rough or smooth a 3D-printed surface is. A high Ra value means the surface is rough, which can affect how the object fits, moves, or works in a project. For example, rough surfaces may cause friction, poor sealing, or weak bonding.
A lower Ra value gives a smoother surface, making the object function better and look nicer. By controlling the Ra value, you can improve the quality and performance of your 3D-printed parts.
How to print on a rough surface?
Printing on a rough surface can be challenging, but with the right adjustments, it’s possible. First, ensure your print bed is clean and level for better adhesion. Use a good adhesive, like glue or a special print surface, to help the first layer stick properly.
You can also try increasing the first layer height or reducing the print speed to improve the bonding. If the roughness is on the object, adjust settings like temperature, layer height, or nozzle distance to get a smoother and more successful print.
How does post-processing affect the surface roughness of 3D prints?

Post-processing plays a big role in improving the surface roughness of 3D prints. After printing, the surface may have visible layer lines or rough spots. Techniques like sanding, polishing, or chemical smoothing remove imperfections and improve the finish.
For some materials, like resin, washing and curing can create smooth surfaces, while others may need grinding or coating.
How to Measure Surface Roughness?
- Use a Profilometer: A device that moves a needle over the surface to measure bumps and roughness.
- Try Visual Inspection: Look at the surface closely, though this is less accurate.
- Use 3D Scanning Tools: Some scanners can estimate surface roughness from the print design.
- Check Ra Values: Ra measures average roughness; a lower number means a smoother surface.
- Software Analysis: Some slicer software can predict surface roughness based on printing settings.
- Post-Processing Testing: After smoothing, recheck to see if the surface quality has improved.
Read Also: 3d Printer Blobs On First Layer – The Guide Of 2024!
What are the differences in surface roughness between SLA and DMLS technologies?
Here’s a simple comparison table showing the differences in surface roughness between SLA (Stereolithography) and DMLS (Direct Metal Laser Sintering) technologies:
| Feature | SLA (Stereolithography) | DMLS (Direct Metal Laser Sintering) |
| Material | Resin-based (photopolymer) | Metal powders (stainless steel, titanium, etc.) |
| Surface Roughness | Smoother finish, fine details, but can have visible layer lines | Rougher finish, more noticeable layer lines, requires post-processing |
| Precision | High precision for intricate details | High precision for functional metal parts |
| Post-Processing | Light sanding or polishing needed for smooth finish | Requires significant post-processing like polishing or machining |
| Use Case | Best for prototypes and detailed models | Best for functional parts, tools, and production-quality metal parts |
What are the best practices for reducing surface roughness in 3D printing?

Here are 5 best practices for reducing surface roughness in 3D printing:
- Level the Print Bed: Ensure the print bed is clean and properly leveled to help layers stick evenly.
- Adjust Print Settings: Use smaller layer heights and slower print speeds for a smoother finish.
- Use Good Quality Filament: High-quality filament reduces inconsistencies and rough surfaces.
- Clean the Nozzle: Regularly clean the nozzle to avoid clogs and uneven extrusion.
- Post-Processing: Sand, polish, or use smoothing techniques to improve the surface after printing.
Read Also: 3d printer bulging corners – Enhance Print Quality!
Frequently Asked Questions
1. Can surface roughness be reduced after printing?
Yes, post-processing techniques like sanding, polishing, or chemical smoothing can reduce roughness. These methods remove imperfections, making the surface smoother and improving the final appearance.
2. Why is surface roughness important in functional parts?
Surface roughness affects how well functional parts perform. Smooth surfaces reduce friction, improve sealing, and ensure proper movement. Roughness can impact the fit, strength, and usability of 3D-printed parts.
3. Why does my 3D print feel rough?
A rough 3D print is usually caused by incorrect printer settings, like high layer height or incorrect temperatures. Poor-quality filament or a dirty nozzle can also lead to roughness. Adjusting the settings and ensuring a clean nozzle can help smooth the print.
4. Why is my 3D printer surface not smooth?
An unsmooth surface can happen due to uneven bed leveling, incorrect nozzle height, or improper print settings. Issues like using low-quality filament or printing too fast also contribute. Proper calibration and good filament quality can help improve smoothness.
5. How do you smooth surfaces on 3D prints?
You can smooth 3D print surfaces by sanding, polishing, or using smoothing chemicals like acetone for PLA. Post-processing methods like vapor smoothing or using a heat gun can also help. Adjusting printer settings for finer layers also results in smoother prints.
6. Why does the temperature setting matter for smooth prints?
Incorrect nozzle or bed temperatures can cause uneven extrusion, resulting in rough surfaces. Using the right temperature for your material ensures smooth layers and better adhesion, leading to a more polished final print.
7. Can fast print speeds cause rough surfaces?
Yes, printing too quickly may cause uneven extrusion and rough surfaces. Slowing down the print speed allows the printer to lay down more consistent layers, resulting in a smoother finish.
8. What is Ra, and how does it relate to surface smoothness?
Ra (average roughness) measures the average height of surface imperfections. A lower Ra value means a smoother surface. It helps evaluate the quality of a 3D print and is important for functional and aesthetic parts.
9. How do you smooth a rough 3D print surface?
You can smooth a rough print by sanding it with fine-grit sandpaper, polishing, or using chemical smoothing methods like acetone for certain materials. These methods help remove imperfections and improve the overall finish.
10. Can using better filament improve surface smoothness?
Yes, high-quality filament typically flows more evenly and creates smoother prints. Poor-quality filament may cause clogs or inconsistent extrusion, leading to rough surfaces. Choosing good filament can significantly improve the final print quality.
Conclusion
In conclusion, surface roughness in 3D printing can be caused by various factors like incorrect settings, poor filament, or a dirty nozzle. By adjusting settings, cleaning the printer, and using good-quality materials, you can improve the smoothness of your prints. Post-processing methods, like sanding or polishing, can also help. Ensuring a smooth surface leads to better-looking, stronger, and more functional 3D prints.
Read More:
